(!) Since support from Microsoft will end on January 14th, 2020, Windows 7 will be excluded from the recommended environment from December 15th, 2019 on this site. Vì lý do Microsoft kết thúc hỗ trợ cho Windows 7 vào ngày 14/01/2020, Windows 7 sẽ là hệ điều hành không được khuyến khích sử dụng với trang web này từ ngày 15/12/2019.
Search by Category / Brand Tìm theo danh mục, nhãn hiệu
Search by Category Tìm theo danh mục

- Thể lệ và Giải thưởng cuộc thi "Thiết kế máy Tự động hóa 2025" do MISUMI Việt Nam tổ chức. Xem chi tiết.
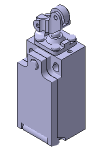
OMRON Limit Switch(Lever Shape Type:One Way Roller Vertical)
OMRON offers products Limit Switch specified by Lever Shape Type One Way Roller Vertical from Automation Components product category. There are a total of 1 items. Search and select detailed specifications of parts for your machine with free CAD download. OMRON products are available to order through MISU
OMRON offers products Limit Switch specified by Lever Shape Type One Way Roller Vertical from Automation Components product category. There are a total of 1 items. Search and select detailed specifications of parts for your machine with free CAD download. OMRON products are available to order through MISUMI online 24/7. Free shipping, no minimum order.

Brand |
|
|---|---|
Filter By |
|
| CAD |
|
| Days to Ship |
|
1 itemsMặt hàng
- Sort By
-
You can add up to 6 items per a category to the compare list.

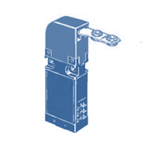
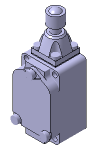
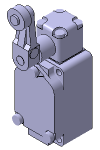
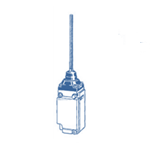
![Small Enclosed Switch [D4E-□N]](//vn.misumi-ec.com/linked/material/mech/OMR1/PHOTO/OMR1_221000559262.jpg?$product_view_b$)
- On Sale Till 31/03/2025
Small Enclosed Switch [D4E-□N]
OMRON
Meets the needs such as light, thin, short and compact model, high durability and high seal with further improvement in performance of D4E.[Features]· Improved snap action property, high durability by changing lever ratio of spring of built-in switch board.· Excellent in dust resistance, oil resistance by using a cover for built-in switch.· Moreover, high durability of seal cap of plunger.· Connector system capable of reducing the maintenance ti...Readmore
- CAD :
- 2D
Detector Shape Main Body Size Environment Plunger Shape Type Number of Plunger Rows Roller Lever Shape Type Lever Shape Type Rod Shape Type Contact Type Contact Point Type Contact Material Rated Operating Voltage(V) Rated Conductance Current(A) Plunger Type Small Type Standard / Oil Resistant / Dust Resistant Roller Plungers - - One Way Roller Vertical - Single Pole Double Throw - - 30 VDC or Less / AC100/125V 0.1 ~ 5 From: 448,800 VND Special Price Days to Ship: Số ngày giao hàng: Same day or more  Same day or more
![Small Enclosed Switch [D4E-□N]](http://vn.misumi-ec.com/linked/material/mech/OMR1/PHOTO/OMR1_221000559262.jpg?$product_view_b$)
![Small Enclosed Switch [D4E-□N]](http://vn.misumi-ec.com/linked/material/mech/OMR1/PHOTO/OMR1_221000559262.jpg?$product_view_c$)
Loading...Tải…
ConfigureTạo
Specification/DimensionsĐặc điểm kỹ thuật / Kích thướcĐặc điểm kỹ thuật / Kích thước
-
Detector Shape
-
Plunger Type

-
Roller Lever Type (Rotary)

-
Lever Shape (Push)
-
Rod Shape
-
No Lever Type (Knurled Shaft)
-
Others
- Roller lever type
-
Plunger Type
-
Main Body Size
- Standard
- Small Type
-
Environment
- Standard
- Outdoor Corrosion Resistant
- Cold Resistant
- Heat Resistant
- Hydrogen Gas
- Weather Resistant
- Oil Resistant
- Dust Resistant
- Water Resistant
-
Plunger Shape Type
-
Top Plunger
-
Ball Plungers
-
Roller Plungers
-
PerpendiCular Side Roller Plungers
-
Side Surface Plunger
-
Side Surface Ball Plunger
-
Multiple
- Push Plunger
-
Top Plunger
-
Number of Plunger Rows
-
Roller Lever Shape Type
-
Standard
-
Fork Lever Lock
-
Variable Roller Lever
-
Center Roller Lever

-
Variable Rod Lever
-
Spring Rod Lever
-
Standard
-
Lever Shape Type
-
Rod Shape Type
-
Contact Type
-
Contact Point Type
-
Contact Material
-
Rated Operating Voltage(V)
-
Rated Conductance Current(A)


Related Categories to Limit SwitchDanh mục liên quan đến Limit Switch
FAQ Limit Switch
- Question: Can the Limit switch be used for doors?
- Answer: Yes, limit switches can be used for door safety functions. In fact, they are commonly used in industries to ensure the safe operation of doors, gates, and access points in automated systems. To use a limit switch for door safety, you would need a "safety limit switch."
There are two main types of safety limit switches suitable for door safety:
Mechanical Safety Limit Switches: These switches have a physical actuator that comes into contact with the door or gate, triggering the switch when the door reaches a certain position. They can be used to detect when the door is fully open or closed.
Non-Contact Safety Limit Switches: Also called "safety interlock switches" or "coded magnet switches," these use non-contact technology to detect the presence or alignment of a magnet on the door. They are more tamper-resistant and are often used in critical safety applications. - Question: What is the purpose of a Limit switch with a long lever?
- Answer: A limit switch with a long lever serves the purpose of detecting the presence, absence, or position of an object with a larger range of movement. The long lever acts as an extension, allowing the switch to respond to changes in position over a greater distance. This type of switch is commonly used in applications where the movement of the object being sensed is not directly aligned with the switch itself.
For example, imagine a conveyor belt where products of varying sizes move along. A limit switch with a long lever could be positioned such that the lever comes into contact with the products. As each product passes by, it engages the lever, causing the switch to activate. The longer lever provides the necessary reach to detect objects that might be positioned farther away from the switch housing.
In simpler terms, a limit switch with a long lever is like having an extended arm that can reach out and touch something that's not right next to it. - Question: How do I connect or install a limit switch?
- Answer: Step by step to install the limit switch
1. Choose Mounting Location: Determine where you want to install the limit switch. Make sure it's strategically placed to sense the desired movement or position.
2. Prepare Mounting Surface: If needed, prepare the surface by drilling holes for mounting screws or bolts. Ensure the surface is clean and flat.
3. Mounting: Attach the limit switch to the mounting surface using screws, bolts, or a bracket provided with the switch. Ensure the switch is securely fixed and aligned properly.
4. Connect Wiring: Refer to the manufacturer's wiring diagram or schematic for guidance. Typically, limit switches have several terminals: common (COM), normally open (NO), and normally closed (NC). Connect wires from your control system to these terminals based on your application's requirements.
5. Wire Connection: Strip the ends of the wires and attach them to the appropriate terminals. Use screw terminals, crimp connectors, or other suitable methods as specified by the switch's manual.
6. Secure Wires: Make sure the wires are properly secured and won't be pinched or pulled when the machine or system operates.
7. Adjust Actuator: If the limit switch uses an actuator (lever, roller, etc.), adjust its position so that it's activated when the desired movement or position is reached.
8. Test the Installation: Carefully test the limit switch by manually triggering its actuator to see if it activates and deactivates correctly. Make any necessary adjustments if it's not functioning as expected.
9. Final Check: Double-check all connections, screws, and adjustments to ensure everything is secure and properly aligned.
10. Power On: Power up the system and observe the limit switch's behavior during regular operation. Confirm that it accurately detects the intended movement or position.


How can we improve?
How can we improve?
While we are not able to respond directly to comments submitted in this form, the information will be reviewed for future improvement.
Customer Privacy Policy
Thank you for your cooperation.
While we are not able to respond directly to comments submitted in this form, the information will be reviewed for future improvement.
Please use the inquiry form.
Customer Privacy Policy